To Main Page

To Main Page |
 |
| Headlight Actuation |
| The Original System |
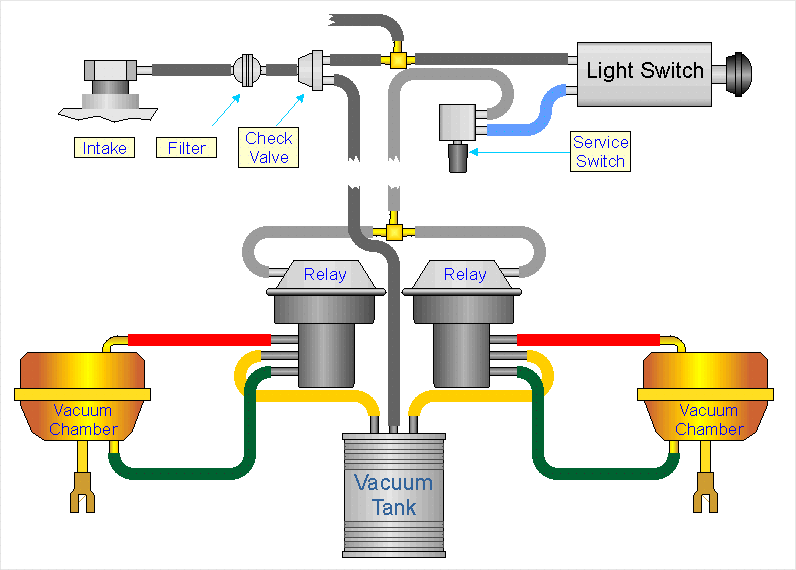
| The headlight lift mechanism on a C3 is an interesting arrangement
of mechanical and vacuum components. The lift is provided by two vacuum
chambers near the headlight housing. Vacuum is tapped at the intake manifold and split into two streams after a check valve. One is connected to the "Soup Can" storage tank between the headlights. The second stream snakes through the firewall to the light switch, service switch and then down to the vacuum relays near the headlights. This is the trigger line. It is the smaller of the two lines. The original hoses are color coded as shown below in the drawing. |
 |
| The Problems And Changes |
| The system on the car was operating erratically. Time for a little diagnosis work. One chamber seal was found to be bad and required replacement. It is pretty simple mater to change the seal but getting the actuator in and out was a chore. Once done the lights operated fairly well but there were still some annoying vacuum leaks. |
To simplify the system it was decided to trigger the
chambers electrically rather than with vacuum. This would cut the total hose in
the system to help minimize the sources for leaks. The hoses through the
firewall would not be needed.
A Humphrey 420 solenoid valve was purchased. It is designed for continuous duty and vacuum operation. Some solenoids designed for pressure will leak when used in vacuum operations To connect to the original hoses barbed tee fittings were installed on short lengths of vacuum hose on the two outlet ports and the inlet port. A six inch length of tube was connected to the exhaust to keep contamination out. |
|
| The solenoid can be directly connected to the light
switch before the high/low beam switch. Alternately a double throw switch can be put in to mimic the original vacuum service switch. In one position the headlights will raise if vacuum is present. In the other the headlights will raise only when turned on. The solenoid operation is simple. In the default (off) mode it connects the vacuum to the "Down" side of the chamber making the headlights go down. When triggered (lights on etc.) it connects the vacuum tank to the "Up" side of the chamber. |
|
The solenoid was mounted on the center bar that holds
the vacuum tank. Two rubber faced loom clamps wrapped the center bar and were
bolted to the solenoid. The valve takes up very little room.
|
|
| Storage Tank |
| Still there were some leaks. After some looking it was
discovered that the previously repaired storage tank was leaking again. The
seam was beginning to crack around the perimeter. Instead of replacing it at $60 a new design was need just because that would be more fun. It used standard ABS black pipe and caps. The ends were capped and sealed with plugs. The side was tapped for inlet and outlet fittings. Aluminum strap mounts were made and attached to the retaining screws on the lower air dam. They were even polished to a nice shine. The tank sits up in the recess of the air dam making access very easy from under the car. |
|
|